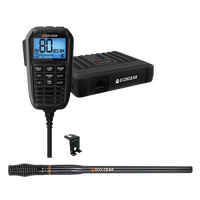
Oricom UHF390 5W CB Radio with Controller Speaker Mic
SKU: UHF390 Learn More»Product Description
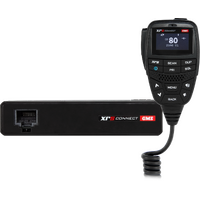
Oricom UHF390 5W CB Radio with Controller Speaker Mic, 5 year warranty. The UHF390 removes the need for a head unit, with all of the radio’s controls in the microphone. The integrated speaker in the controller mic works with the transceiver speaker to deliver exceptional sound quality and volume. Perfect for modern vehicles where space is limited.
Features:
- 5 watt (max TX power).
- Heavy duty controller speaker microphone.
- Rugged micro size transceiver.
- Large easy to read LCD display.
- Automatic Level Control (ALC) for consistent audio levels.
- 38 CTCSS and 104 DCS codes.
- Duplex (range extender).
- Open/Priority scan.
- Priority channel.
- Tri colour backlit LCD display (Amber/Red/Green).
- 3.5mm external speaker jack.
- Designed for Australian conditions.
- 5 year warranty.
- Audio equaliser.
- Rugged and reliable construction.
- Dual speaker.
- 5 year warranty.
Specifications
SKU UHF390
Brand Oricom
GTIN 9338161005321
Warranty Period: 5 Years
Product Category UHF, Radios and Antennas
Dimensions (WxHxL mm) Transceiver 102 x 27 x 85
Videos
Oricom UHF390 5 Watt CB Radio with Controller Speaker Microphone
Product Q&A
-
Is this radio suitable for use outside of Australia?
All Oricom products are approved for use in Australia and NZ only, and although they will still work in other countries, they may not meet that countries requirement’s for voltage, operating frequencies or power RF levels and if used may interfere with other services which could attract penalties from the local administration authorities.
-
How do I return the radios features back to Factory settings?
If the radio’s display locks up or stops functioning properly, you might need to reset your UHF radio. Caution: This procedure clears all the information you have stored in your UHF radio.
Before you reset your UHF radio, try turning it off and on again.
If your UHF radio is still not functioning correctly, you may need to reset the UHF radio.
To reset, press and hold monitor button and power on. “Reset” will appear in the display. The radio will then return to standby mode. -
How do I turn on the unit?
Press and hold the Channel selector. At power on, the current applied DC voltage is displayed numerically. Special over and under voltage detection circuitry protects the radio and warns of excessive voltage conditions by the LCD flashing the 3 backlight colours.
-
How do I select a channel?
Press channel selector once. “CH” will appear on the LCD. Select the channel by rotating the channel knob.
-
What is the PTT?
Pressing the PTT allows audio to be transmitted, by speaking across the front of the controller speaker microphone. TX is indicated by the level bars on the LCD display. To receive, release the PTT button and then TX will disappear on the display. When transmitting, hold the MIC 5 cm from your mouth and speak clearly in normal voice across the front of the mic.
-
How do I access the menu list?
The Menu function provides a convenient method of customising some of the radios functions. Note that some items are only available on certain channels.
To access the Menu functions:
1. Press and hold the TW/MENU button. The first menu function is displayed.
2. Briefly press the menu button to cycle through each available function.
After the last function has been selected, the cycle automatically exits the menu.
3. Use the volume control to change the parameters of the selected function.
4. To exit the menu, press PTT button or press and hold the menu button for 2 seconds. -
What are the wiring configurations for connecting to the vehicles power supply?
There are two possible wiring configurations for connecting to the vehicles power supply.
A) Radio stays ON when the ignition is switched OFF
Connect the radio’s negative (black) lead to the vehicle chassis, or directly to the battery’s negative terminal.
Connect the radio’s positive (red) lead via the 3 Amp fuse to the battery’s positive terminal. Alternatively, the positive lead could be connected at the fuse box at a point that has DC Power continuously available (preferably the battery side of the ignition switch) via the 3 Amp fuse.
B) Radio turns OFF with the ignition switch
Connect the radio’s negative (black) lead to the vehicle’s chassis, or directly to the battery’s negative terminal. The radios positive (red) lead should connect to an accessory point in the vehicle’s fuse box via the 3 Amp fuse. -
How do I set the volume on this unit?
Turn the channel selector clockwise to adjust the sound level for comfortable reception.
-
How many backlight colours on this unit?
You can select from 3 different colours for the LCD backlight.
Customer Reviews
Warranty
For details relating to this product's warranty CLICK HERE
Delivery
For details relating to our delivery process CLICK HERE


.png)

